Here are the instructions to re-create the pages that we made in class on Saturday. I cut the 12x12 from Canford Paper so there were enough offcuts left over to make this into a double page spread.
Cut a 3 1/2 inch strip from the spotty 12x12. Cut this up into three pieces, a 2 /12 inch piece, a 3 inch piece and a 5 /12 inch piece. The bit that falls off the end isn't needed.
Stick the pieces onto the top of the 12x12 grey/brown page with a 1/2 inch gap between them. Because the decorative paper is double-sided you can flip the paper over to have different patterns showing. If you want to decorate the large rectangle (I used iris folding to decorate mine) I would suggest decorating it before you stick it to the page.
Cut another 3 1/2 inch strip from the spotty 12x12 and cut this into three pieces. Cut a 3 inch piece, a 2 1/2 inch piece and another 3 inch piece. The bit that falls off the end isn't needed.
Stick these pieces to the bottom edge of the 12x12 as shown, again leaving a 1/2 inch gap between the pieces on the left.
Stick the 6x4 piece of pink cardstock to the 12x12 as shown.
Cut a 4 inch strip from the spotty paper and cut this evenly into 3 inch pieces.
Stick one piece on the right hand side of the 12x12, in line with the plain pink card.The other 3 pieces will now be used to make the 2nd 12x12 page.
Stick together the 3 pieces of patterned card along with the piece of plain card that you have (which measures 3x4 inches) to make a border. Stick the border to the piece of grey/brown paper (which measures 12x8 inches) to make a new 12x12 page.
Place double-sided tape along the join and cover with silver-grey ribbon.
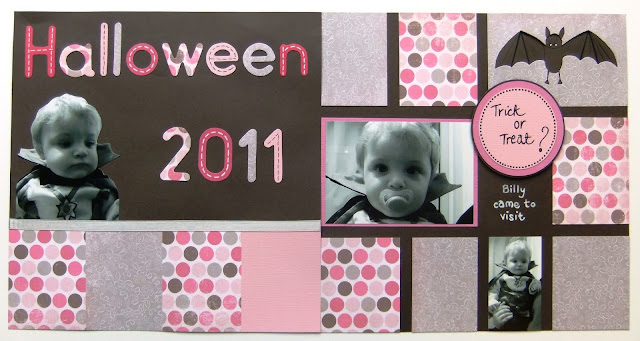
Cut a 3 inch circle from the pale pink card and a 3 1/2 inch circle from the darker pink card. Stick the circles together and then stick them onto the grey/brown paper. Cut out the circle shape again, leaving a small border showing around the pink circles.
Finish the main page by adding your decorated rectangle, the main photo which I cropped to 5 3/4 x 3 3/4 inches, a mini photo which I cropped to 2 x 3 1/2 inches and the circles. I stuck the circles on with sticky fixers and journalled in the space left with a white pen.
To finish the second page I cut around an extra photo and tucked the bottom edge just under the lip of the ribbon. I also added a large title which I made from leftovers of the patterned and plain card. Alternatively you could add a smaller title or maybe just the date and you would have room for more photos.
 Here are the instructions to re-create the pages that we made in class on Saturday. I cut the 12x12 from Canford Paper so there were enough offcuts left over to make this into a double page spread.


